Here is my flower for May that came in my kit from The Wood Connection. I got a flower for May, A lady bug for June, An uncle sam hat for July and a sun for August. They have 3 diffrent kits with a wood decoration to go along with each month. I got the May, June, July, August, because that is the months that are coming up and I need some summer decorations.
Supplies Needed
Sun-The Wood Connection
Yellow Paint
Red paint
Glue Gun
paper towels
Well I started out with just plain yellow and well it just wasn't looking how I wanted it to so I got creative I guesss you could say and....
I took a paper towel and dipped it in my red paint. The first layer I put on smudged it in after with another paper towel. Then my 2nd layer I did more of a sponge method on it. I do have to say I love how it turned out.
divider
Wednesday, March 31, 2010
May Flower
Here is my flower for May that came in my kit from The Wood Connection. I got a flower for May, A lady bug for June, An uncle sam hat for July and a sun for August. They have 3 diffrent kits with a wood decoration to go along with each month. I got the May, June, July, August, because that is the months that are coming up and I need some summer decorations. It is an awesome store that if you can go down there I would say go. There is so much to see and you will want to do it all. If you can't make it down order online.
Supplies Needed
Wood Flower-The Wood Connection
Red Paint
White Paint
Yellow Paint
Paint Brushes
Pencil
First I painted the flower red. Since that wasn't looking just right for me I took the end of a pencil and dipped it in white paint and then added the white dots. Well that still wasn't "enough" for me so I took the pointy end of the pencil and dipped it in yellow paint and put it in the center of the white paint. I know from a far off distance you wont see the yellow dots but I still think it adds something to the flower.
June's Lady Bug
Here is my finished lady bug I got from The Wood Connection. It came in a kit with a Flower for May, A lady bug for June, A uncle sam hat for July, and a sun for August.
Supplies
Wooden Lady Bug- the wood connection
Red Paint
Black Paint
Paint brushes
Hot Glue gun
Ribbion
Supplies
Wooden Lady Bug- the wood connection
Red Paint
Black Paint
Paint brushes
Hot Glue gun
Ribbion
Mummy
Yeah I know it is to early for Halloween but as soon as I saw these I had to make them. I can't remember where I found the idea but as soon as I find it I will post the link or if any of you know who it is give me a heads up. (Ha HaHa After some searching I found the link Inspiring Creations) Anyway here it is my tutorial.
Supplies Needed
2 Terricotta Pots
White paint
White fabric
Googlie Eyes
Brown ink pad
Hot Glue Gun
Paint your pots white.
Supplies Needed
2 Terricotta Pots
White paint
White fabric
Googlie Eyes
Brown ink pad
Hot Glue Gun
Paint your pots white.
Glue your googlie Eyes just below the rim of the pot. Then wrap your pots in white fabric giving them the Mummy like effect. Use your hot glue gun to glue in the spots you need to to hold the fabric in place. Then take your ink pad and kind of ink your fabric. This will give it the older look that your mummy needs.
Because I didn't like the small google eyes I took them off and put the larger ones on. I liked it a lot better.
Easy Chocolete Cream Pie
Alright I know for probally all of you this is a given but the other night I did this and it was Yummy...
Graham Cracker crust- yes I used the ready made ones from keebler
Instant/cook and serve chocolete cream pudding- Poor on top of the graham cracker crust
Cool Whip- Put on top of the pudding
Top with Heath/score bar
Graham Cracker crust- yes I used the ready made ones from keebler
Instant/cook and serve chocolete cream pudding- Poor on top of the graham cracker crust
Cool Whip- Put on top of the pudding
Top with Heath/score bar
Monday, March 29, 2010
Quick and Yummy Sugar Cookies
I have been looking for the cake mix cookie recipe forever. Well the gals over at Sister's Stuff helped me out.
1 white cake mix
2 eggs
1/3 c veggi oil
Mix together. Now I had to add a little water because mine were to dry. I dropped spoonfuls on a sprayed cookie sheet. Bake at 350 for 6-8 minutes.
I sprinkled sprinkles on the top cookies befor I cooked them. but I am sure you can frost them to.
Samon and Asparagus
I would like to say that this was all completely from scratch but the rice is just rice-a-roni. I know I know how hard is rice right well with 4 kids and running around that came easiest.
As for the Samon I was going to be brave and try a new recipe I saw on Good Things Utah for pouched Samon but when I went to make and look at the recipe it wanted Sunny D and well I didn't have any and wasn't going to drive back to the store for some so I turned it over to my hubby and well with a little of this and little of that (literly that is what he does) we had some grilled samon.
Now the Asparagus... I love Asparagus problem is I don't really know how to cook it so it turns out just right until I found this recipe about a year ago and it is quick and easy.
Baked Asparagus
Take a casserole dish spray with pam/non stick cooking spray.
1 bunch of Asparagus
2 tbsp of Olive oil
2 cloves of minced garlic
Parmasan Cheese
Lay your Asparagus in the bottom of your pan
poor olive oil and garlic over the asparagus and then toss around so that all the Asparagus is covered.
Bake at 350 for about 25 min. on the last five minutes sprinkle with parmasan cheese.
YUMMY
He loves to dip bread in oils and vinegars so we had our two oils and viniger and since we didn't have any special bread he toasted our regular wheat bread and we just dipped it in that.
Sunday, March 28, 2010
Summer Flowers
These are my cute summer flowers for my holiday shelp/mantel. I got the Flowers Here. You can drive down there if you live close enough or you can have them ship it to you whatever works best for you.
Alright to get started...
I took my flower and traced it on the papers that I wanted each flower to be and then cut them out and mod podge them on. Gotta Love Mod podge makes life so much easier.
Once I was all done with that...
I sanded around the edges of each one and then inked them to give them an antique look. I like the bright colors of my paper but I also really like the antiqued look. Once I had my mostly done I set them aside and moved on to my blocks.
These blocks are a 2x2 I bought off line somewhere but I should have gone to home depot and just bought a 4x4 and cut it down. A whole lot cheaper and a lot more blocks for less money. Lesson learned!
Once again loving my mod podge I mod podged some green paper on the side of the block for the base of my flowers. Then I again I sanded the edges and inked so it would have that antique/or dirty if that is what you think. (My daughter told me it just looks dirty when I do that)
For the finish I wrapped my dowels in diffrent green ribbions I have. Had my trusty father drill holes in the bases and the flowers to go through. Then glued buttons for my center of my flowers and put them all together for a WAAALAAA Finally finished after almost 3 weeks of from start to finish. Sad I know but my set back was my holes being drilled and my hubby kept putting it off so I had to go to my next resource MY DAD!
Saturday, March 27, 2010
Uncle Sam Hat
I got this in my kit I bought atThe Wood Connection. They have these kits where you one decoration for each month. Each kit encludes 4 months. So you have Jan-April, May-August, Sept-Dec. This one is the May-August kit obviously and the Uncle Sam's hat is for July. You can go into Here and see how they have decorated theirs and see what else comes in the May- August kit. I just haven't got the others done yet.
So here is what I did for the Hat.
First I cut my strips of fabric the width that I wanted. I used my fabric cutter and board just to make sure they were straight and all the same width.
Then I lined them up and mod podge the first color on.
Then I went on to my second layer of fabric. Now the fabric I was using was some fabric I have had for a couple of years now and was already cut into 4 x4 squares so I had to piece some together a little bit.
Now for the third layer of fabric.
Then I painted some small stars and hot glued them to some wire, drilled a whole in the top put some glue in the whole and stuck the end of the wires in And dum de dum... I have my uncle sam hat. I may add some glitter or something to the stars comming out of the hat. I just feel like they are missing something.
Friday, March 26, 2010
Ear Infections
Ever wonder what to do for nasty ear infections. Especially on the weekend when the Dr. isn't in and your little ones wont sleep. Tabacco in the ear. Just a little bit. Take tabacco leaves or a can of chew, just a little bit put it in a sauce pan with a little water bring it to a simmer. Stir it up a little bit. Dip a cotton ball or for those smaller ears Q-tip. ( I have even done a spoon with just a little bit in the spoon when I haven't had a cotton ball or Q-tip) Set the cotton ball/Q-tip on the ear. (of course let it cool down if it is to hot. You do want it slightly warm though) Let it sit there for a minute. I can't gaurentee 100% because maybe it doesn't work for some but I would dare say 99%. Every time I have tried this on myself, husband or kids it has worked. Some how it draws out the infection and takes the pain away. Works Wonders.
Chest congestion and cold
Vicks on your feet at bed time. Then socks over them. So simple. Works great for those coughs and runny noses. Then you don't have to have it on your chest. My kids love it. Every time I pull out the "feet medican" for one they all line up to have their feet done.
Cradle Cap
Ever wonder what to do when your baby has really bad cradle cap. Well my doctor gave me a "secret" with my oldest son who had it really bad. Then when it has happened again with my second son I am going back to the easy secret. Head and Shoulders shampoo. Crazy I know. or maybe you already know this secret but I didn't and it works great. A small amount of shampoo 3 times a week and it clears it up.
Monday, March 22, 2010
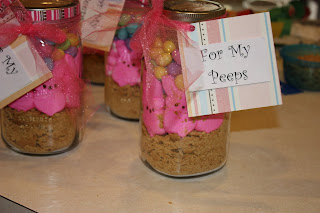
Easter Bunny S'mores
I have seen these on a few diffrent websites and thought they would make cute gifts for my friends, neighbors and ladies I visit teach. As I was making them Karli came and said she wants to make one for her teacher so I guess we will be making one more. The recipe I used was from Sugardoodle.net. I think there are a few diffrent ones out there but for the most part they are all the same. I haven't tried them yet. My husband thinks I am crazy to be giving out something I haven't even tried yet but I figure anything with PEEPS must be good right?
INGREDIENTS AND DIRECTIONS:
1. Reduce 1 sleeve graham crackers to crumbs.
2. Layer 2/3 of the crumbs in a 1 quart jar.
3. Place 8 marshmallow bunny peeps standing up, facing out around the inside of the jar.
4. Press them up against the glass, but don't squash them.
5. Carefully spoon remaining crumbs in the center of the jar to support the bunnies, pressing down to keep it snug.
6. On top of this pour 1-1/4 cup Easter M&M's. On Sugardoodle she also used Cadberry Eggs to so you can switch between the two.
7. Spoon 1/3 cup brown sugar into center of M&M's, gently pressing with a spoon.
Attach a gift tag with the following instructions:
EASTER BUNNY S'MORES
1. Empty the jar contents into a bowl. Snip the bunnies into bits with kitchen sheers or cut up with a knife. Return the bunny bits to the mixture. Mix well.
2. Melt 1/2 cup butter; add 1 teaspoon vanilla. Pour this over the dry ingredients, mixing well. Pat into a greased 9" square pan. Bake at 350 degrees F for 15 minutes. Cool and cut into bars. (Makes 9 to 12 bars.)
*Optional - leave bunnies whole; combine remaining ingredients and place the bunnies on top; then bake as directed.
*This gift jar may be created to suit any holiday for which marshmallow candies are available.
Sunday, March 21, 2010
Covered Tin
Well I have seen these all around and thought they should be cheap fairly easy to make. HMMM. Little mistaken on the easy part but they are fairly cheap. Karli came home and said she wanted to give her friend a gift so I thought this was the perfect time to try right. Hopefully the girls mom isn't really crafty and sees all my flaws. lol
Supplies Needed.
Tin (I got mine at DI-Desert Industries for $1.00)
Fabric/paper (if you use fabric go to Walmart theirs is cheap and works well for a project like this)
Mod Podge
Ribbion
Embelishments
Hot Glue Gun (I Beacame a pro with it in this project)
Take your tin and Mod podge one side and then start wrapping your fabric around it. Mod podging one side at a time as you go.
Onece you have all four sides completed or if it is round you have gone all the way around it should look something like this.
My next step was wrapping ribbion around the bottom. This I used the hot glue gun for.
Next I put ribbion on my handles and my top which I later took off the top and had to redo it because the lid wouldn't fit on. (plan ahead)
Like I said I took the top ribbion off and moved it down below the lid line so the lid would fit on.
Add your Embelishments. We did a G because her friends name starts with a G. I added some brads to the Handles so it would cover up some flaws.
Karli wanted a K on the back because they are Friends and she wanted a G for Greta and K for Karli.
For the lid.....
I decided I wanted a "cusion" on my lid so I got a piece of batting and hot glued it to the top of the lid.
Then I cut a peice of fabric to fit the top as well. Now here is where the lid got a little tricky the corners.
I glued the fabric on one side all the way around or at least till I came to the edge of the fabric.
Then I kind of tucked the corners like you would if you were gift wrapping a present. Then I glued it down and cut off the excess fabric.
More ribbion around the top to cover up the fabric flaws. and some more brads to cover up where the ribbion met.
And TA DA it is finished.
Subscribe to:
Posts (Atom)